Thursday, December 23, 2010

ComboBox SelectedValueChanging Event

Introduction

For some reason, a standard WinForm ComboBox does not contain SelectedValueChanging event, which may be useful if you're requested to intercept a change or cancel it.

After searching for a possible solution on the web, I've found a nice example and adopted it with slight modifications.


SelectedValueChanging Event

Generally, subclassing common WinForm controls is a good idea, since it allows you to customize their appearance and behavior in a single place and affect all instances in the entire application.

In this case, we will subclass a ComboBox class and add the SelectedValueChanging event:


public partial class nessComboBox : ComboBox
{
public event CancelEventHandler SelectedValueChanging;

private object m_LastAcceptedSelectedValue;
private bool m_IgnoreNullPreviousValueChanging = false;

public nessComboBox()
{
InitializeComponent();
}

[DesignerSerializationVisibility(DesignerSerializationVisibility.Hidden)]
[Browsable(false)]
public object LastAcceptedSelectedValue
{
get { return m_LastAcceptedSelectedValue; }
private set { m_LastAcceptedSelectedValue = value; }
}

[DesignerSerializationVisibility(DesignerSerializationVisibility.Hidden)]
[Browsable(false)]
public bool IgnoreNullPreviousValueChanging
{
get { return m_IgnoreNullPreviousValueChanging; }
set { m_IgnoreNullPreviousValueChanging = value; }
}

protected void OnSelectedValueChanging(CancelEventArgs e)
{
if (SelectedValueChanging != null)
SelectedValueChanging(this, e);
}

protected override void OnSelectedValueChanged(EventArgs e)
{
if (SelectedValueChanging != null)
{
if ((!m_IgnoreNullPreviousValueChanging ||
LastAcceptedSelectedValue != null) &&
(LastAcceptedSelectedValue ?? string.Empty).ToString()
!= (SelectedValue ?? string.Empty).ToString())
{
CancelEventArgs cancelEventArgs = new CancelEventArgs();
OnSelectedValueChanging(cancelEventArgs);

if (!cancelEventArgs.Cancel)
{
LastAcceptedSelectedValue = SelectedValue;
base.OnSelectedValueChanged(e);
}
else
SelectedValue = LastAcceptedSelectedValue;
}
else if (m_IgnoreNullPreviousValueChanging &&
LastAcceptedSelectedValue == null
&& SelectedValue != null)
{
LastAcceptedSelectedValue = SelectedValue;
}
}
else
{
base.OnSelectedValueChanged(e);
}
}
}


As you can see, the overrided OnSelectedValueChanged method performs all required logic: checks if there are subscribers to the new event and raises it before calling of the OnSelectedValueChanged method.

The variable m_IgnoreNullPreviousValueChanging may be used to ignore the initial selection change from null to some specific value in case of data-binded combo.

That's it,
Mark.

Monday, December 20, 2010

WCF Data Services

Introduction

WCF technology provides several types of services sharing the same undelying infrastructure and we can choose the appropriate service type based on our needs:


In this post, I would like to make a quick overview of WCF Data Services.

According to MSDN, WCF Data Services (formerly known as "ADO.NET Data Services") is a component of the .NET Framework that enables you to create services that use the Open Data Protocol (OData) to expose and consume data over the Web or intranet by using the semantics of representational state transfer (REST).

The main advantage of using WCF Data Services is that it allows easy access to data from any client that supports OData.

Visual Studio makes it easy to create OData service by utilizing an ADO.NET Entity Framework data model.

The following example is based on WCF Data Service Quickstart and built with Visual Studio 2010.

WCF Data Services Quick Start

The example is divided into four steps:
  1. Creating a simple ASP.NET application
  2. Defining a data model based on the well-known Northwind database by using the Entity Framework 4
  3. Adding the data service to to the web application
  4. Creating a WPF client that consumes the service
Let's start with the ASP.NET application:

File--->Project--->ASP.NET Web Application

Name it NorthwindService.

Next step is creating the corresponding data model:

Right-click the name of the ASP.NET project--->Add New Item--->ADO.NET Entity Data Model

For the name of the data model, type Northwind.edmx

Third step is creating the data service:

Right-click the name of the ASP.NET project--->Add New Item--->WCF Data Service

For the name of the service, type Northwind

After completing of these three steps, your project might look like this:


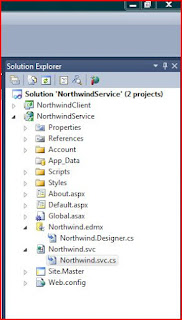
In order to enable access to our data service, we need to grant rights to the particular enities within the model:


public static void InitializeService(DataServiceConfiguration config)
{
config.SetEntitySetAccessRule("Orders", EntitySetRights.AllRead
| EntitySetRights.WriteMerge
| EntitySetRights.WriteReplace);

config.SetEntitySetAccessRule("Order_Details", EntitySetRights.AllRead
| EntitySetRights.AllWrite);

config.SetEntitySetAccessRule("Customers", EntitySetRights.AllRead);

}


Our final step will be creating a simple WPF client for consuming and modifying the model data:

In Solution Explorer, right-click the solution,
click Add--->New Project--->WPF Application.

Enter NorthwindClient for the project name.
Replace the existing code in MainWindow.xaml with this code:


<Window x:Class="MainWindow"
xmlns="http://schemas.microsoft.com/winfx/2006/xaml/presentation"
xmlns:x="http://schemas.microsoft.com/winfx/2006/xaml"
Title="Northwind Orders" Height="335" Width="425"
Name="OrdersWindow" Loaded="Window1_Loaded">
<Grid Name="orderItemsGrid">
<ComboBox DisplayMemberPath="OrderID" ItemsSource="{Binding}"
IsSynchronizedWithCurrentItem="true"
Height="23" Margin="92,12,198,0" Name="comboBoxOrder" VerticalAlignment="Top"/>
<DataGrid ItemsSource="{Binding Path=Order_Details}"
CanUserAddRows="False" CanUserDeleteRows="False"
Name="orderItemsDataGrid" Margin="34,46,34,50"
AutoGenerateColumns="False">
<DataGrid.Columns>
<DataGridTextColumn Header="Product" Binding="{Binding ProductID, Mode=OneWay}" />
<DataGridTextColumn Header="Quantity" Binding="{Binding Quantity, Mode=TwoWay}" />
<DataGridTextColumn Header="Price" Binding="{Binding UnitPrice, Mode=TwoWay}" />
<DataGridTextColumn Header="Discount" Binding="{Binding Discount, Mode=TwoWay}" />
</DataGrid.Columns>
</DataGrid>
<Label Height="28" Margin="34,12,0,0" Name="orderLabel" VerticalAlignment="Top"
HorizontalAlignment="Left" Width="65">Order:</Label>
<StackPanel Name="Buttons" Orientation="Horizontal" HorizontalAlignment="Right"
Height="40" Margin="0,257,22,0">
<Button Height="23" HorizontalAlignment="Right" Margin="0,0,12,12"
Name="buttonSave" VerticalAlignment="Bottom" Width="75"
Click="buttonSaveChanges_Click">Save Changes
</Button>
<Button Height="23" Margin="0,0,12,12"
Name="buttonClose" VerticalAlignment="Bottom" Width="75"
Click="buttonClose_Click">Close</Button>
</StackPanel>
</Grid>
</Window>

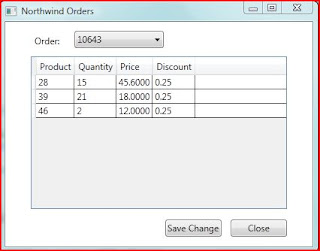
It will give the following look to our client:


We need to add a data service reference to the client project:

Right-Click the project--->Add Reference--->Discover
In the Namespace text box, type Northwind

The only thing left is to to access the service data and we're done.
Copy this code into MainWindow.xaml.cs:


private NorthwindEntities context;
private string customerId = "ALFKI";

// Replace the host server and port number with the values
// for the test server hosting your Northwind data service instance.
private Uri svcUri = new Uri("http://localhost:12345/Northwind.svc");

private void Window1_Loaded(object sender, RoutedEventArgs e)
{
try
{
// Instantiate the DataServiceContext.
context = new NorthwindEntities(svcUri);

// Define a LINQ query that returns Orders and
// Order_Details for a specific customer.
var ordersQuery = from o in context.Orders.Expand("Order_Details")
where o.Customer.CustomerID == customerId
select o;

// Create an DataServiceCollection<t> based on
// execution of the LINQ query for Orders.
DataServiceCollection&lorder> customerOrders = new
DataServiceCollection&lorder>(ordersQuery);

// Make the DataServiceCollection<> the binding source for the Grid.
this.orderItemsGrid.DataContext = customerOrders;
}
catch (Exception ex)
{
MessageBox.Show(ex.ToString());
}
}

private void buttonSaveChanges_Click(object sender, RoutedEventArgs e)
{
try
{
// Save changes made to objects tracked by the context.
context.SaveChanges();
}
catch (DataServiceRequestException ex)
{
MessageBox.Show(ex.ToString());

}
}
private void buttonClose_Click(object sender, RoutedEventArgs e)
{
this.Close();
}


Now we can build and run the application.

As you can see, exposing and consuming a model data with WCF data services is a straightforward process, but that's not the issue, the more important thing that our WPF client can be easily replaced by other clients located in a totally different environment with no change of the service itself.

The runnable code for this tutorial could be downloaded here.

This is it,

Mark..

Tuesday, December 7, 2010

Custom Binding with INotifyPropertyChanged Interface

Introduction

In this post I would like to show a simple example of using INotifyPropertyChanged interface for binding a custom object properties to WinForm controls.

According to Microsoft's documentation INotifyPropertyChanged interface is used to notify clients about properties value changes.

The underneath idea is very simple: implementing this interface, forces raising PropertyChange event, which in-turn notifies client that binded property has changed.

The Example

Let's start with building a simple BankAccount class :


public class BankAccount : INotifyPropertyChanged
{
public event PropertyChangedEventHandler PropertyChanged;

private decimal m_Balance;
private decimal m_CreditLimit;

public BankAccount(decimal initialBalance)
{
this.m_Balance = initialBalance;
this.m_CreditLimit = initialBalance * 2;
}

public decimal Balance
{
get { return m_Balance; }
}

public decimal CreditLimit
{
get { return m_CreditLimit; }
}

public void Withdrawal(decimal sum)
{
if (sum <= m_Balance)
{
m_Balance -= sum;
if (PropertyChanged != null)
{
PropertyChanged(this,
new PropertyChangedEventArgs("Balance"));
}
}
}

public void Deposit(decimal sum)
{
if (sum > 0)
{
m_Balance += sum;
if (PropertyChanged != null)
{
PropertyChanged(this,
new PropertyChangedEventArgs("Balance"));
}

if(m_Balance >= m_CreditLimit)
{
m_CreditLimit = m_Balance * 2;
if (PropertyChanged != null)
{
PropertyChanged(this,
new PropertyChangedEventArgs("CreditLimit"));
}
}
}
}

}

The class contains two properties "Balance" and "CreditLimit" which are going to be binded to our simple UI elements:


Here is the code demonstrating how we actually bind it:


public partial class MainForm : Form
{
private BankAccount m_Account;

public MainForm()
{
InitializeComponent();
m_Account = new BankAccount(1000);

BindControls();
}

private void BindControls()
{
txtBalance.DataBindings.Add("Text",
m_Account,
"Balance",
true,
DataSourceUpdateMode.OnPropertyChanged);

txtCreditLimit.DataBindings.Add("Text",
m_Account,
"CreditLimit",
true,
DataSourceUpdateMode.OnPropertyChanged);
}

private void btnWithdrawal_Click(object sender, EventArgs e)
{
m_Account.Withdrawal(decimal.Parse(txtSum.Text));
}

private void btnDeposit_Click(object sender, EventArgs e)
{
m_Account.Deposit(decimal.Parse(txtSum.Text));
}
}


Now, the binded textboxes will automatically reflect changes of "Balance" and "CreditLimit" properties after calling Withdrawal/Deposit methods:


The working example could be downloaded here.

This is it,

Mark

Saturday, December 4, 2010

Parallel Loops with .NET Framework 4

Introduction

Parallel computing draws a lot of attention at these days, because of amazing pace in which multi-core computers become widely available for industrial and personal use.
Developing applications that can take advantage of this computitional power, requires revision of the existing practices and design patterns, since those practices were born in the sequential world and do not solve similar
We all know that writting paraller applications is difficult and painful mission, not only because of well-known issues such as deadlocks and race-conditions, but simply because human beings have been always struggling to think in a parallel way.
That's why, existing of well-designed patterns for parallel programming is so crucial.

As a C# developer, I've started looking for the parallel programming resources by using .NET framework 4 , and found an excellent paper by Stephen Toub "Patterns of Parallel Programming".
The paper contains in-depth tour in .NET framework 4 for parallel programming.

In this post I would like to show one of the examples from the mentioned above paper :"Parallel Loops".

Parallel Loops

As you can guess, parallel loops allow running independent actions in parallel.
Loops are the most common control stuctures that enable the application to repeatedly execute some set of instructions.
We can use such loop when the statements within loop body have a few or no dependencies.

Creating Manual Parallel For

Let's start with the example of performing parallel "For" manually:


public static void MyParallelFor(int inclusiveLowerBound, int exclusiveUpperBound, Action body)
{
// Determine the number of iterations to be processed, the number of
// cores to use, and the approximate number of iterations to process
// in each thread.
int size = exclusiveUpperBound - inclusiveLowerBound;
int numProcs = Environment.ProcessorCount;
int range = size / numProcs;
// Use a thread for each partition. Create them all,
// start them all, wait on them all.
var threads = new List(numProcs);
for (int p = 0; p <>
{
int start = p * range + inclusiveLowerBound;
int end = (p == numProcs - 1) ?
exclusiveUpperBound : start + range;
threads.Add(new Thread(() =>
{
for (int i = start; i <>
body(i);
}));
}
foreach (var thread in threads) thread.Start();
foreach (var thread in threads) thread.Join();
}


The main drawback of this solution is relative high cost paid for creating and destroying each thread.
We can improve it by utilizing pools of threads:


public static void MyParallelFor(
int inclusiveLowerBound, int exclusiveUpperBound, Action body)
{
// Determine the number of iterations to be processed, the number of
// cores to use, and the approximate number of iterations to process in
// each thread.
int size = exclusiveUpperBound - inclusiveLowerBound;
int numProcs = Environment.ProcessorCount;
int range = size / numProcs;
// Keep track of the number of threads remaining to complete.
int remaining = numProcs;
using (ManualResetEvent mre = new ManualResetEvent(false))
{
// Create each of the threads.
for (int p = 0; p <>
{
int start = p * range + inclusiveLowerBound;
int end = (p == numProcs - 1) ?
exclusiveUpperBound : start + range;
ThreadPool.QueueUserWorkItem(delegate
{
for (int i = start; i <>
body(i);
if (Interlocked.Decrement(ref remaining) == 0)
mre.Set();
});
}
// Wait for all threads to complete.
mre.WaitOne();
}
}


PARALLEL.FOR

The new "Parallel" class has been added to the .NET Framework 4 library. The class provides methods for performing parallel loops and regions, one of them is "For". In his paper Stephen gives a very good example of using Parallel.For in order to trace rays of light. Following code snippets demonstrate the sequential and parallel variations of this problem:


void RenderSequential(Scene scene, Int32[] rgb)
{
Camera camera = scene.Camera;
for (int y = 0; y <>
{
int stride = y * screenWidth;
for (int x = 0; x <>
{
Color color = TraceRay(
new Ray(camera.Pos, GetPoint(x, y, camera)), scene, 0);
rgb[x + stride] = color.ToInt32();
}
}
}

void RenderParallel(Scene scene, Int32[] rgb)
{
Camera camera = scene.Camera;
Parallel.For(0, screenHeight, y =>
{
int stride = y * screenWidth;
for (int x = 0; x <>
{
Color color = TraceRay(
new Ray(camera.Pos, GetPoint(x, y, camera)), scene, 0);
rgb[x + stride] = color.ToInt32();
}
});
}

We can notice that only difference between the implementations is replacing of regular for by
Parallel.For

That's it for now.

I'll continue extracting and adding such small articles to give a "gustations" of the wonderful stuff from Stephen's book.

Mark.